How can we help?
AI Tools in HighLevel
What is AI?
AI, short for Artificial Intelligence, simulates human intelligence in machines to perform tasks that typically require human intelligence. In the context of business, AI offers automation and enhancement of processes, creative assistance, and improved customer experiences.
How AI Works
AI operates on prompts provided by users. A prompt is the directive or content given to the AI, which then generates a response based on the input. Detailed prompts lead to more accurate and relevant AI responses.

Pro Tips for Using AI Effectively
As with any tool, there are tips and tricks to help you succeed and fast-track your success.
Understand AI as a Tool: Recognize AI’s role as a tool that requires understanding and training for optimal use.
Make Detailed Prompts: Provide specific and detailed prompts to get precise AI responses tailored to your needs.
Use AI for Creativity and Research: Utilize AI to kickstart the creative process, generate content ideas, and conduct research efficiently.
Use AI on Auto-Pilot: After training and testing, utilizing AI on auto-pilot allows for automated customer responses and business processes. Many of our AI products allow for this, learn more below.
Practice, Try it Out Now!: Most importantly, just practice using different prompts and tools to help improve your business processes and customer interactions.
Go to Chat GPT and create a free account. Then spend some time practicing! Ask ChatGPT to create something for you. Experiment with different prompts and see what you get. Think about how you can add it to your business processes and customer interactions.
AI Tools in High-Level
Within HighLevel we have several built-in tools to help you utilize AI to grow your business. Let’s review each of them below.
Content AI
Content AI enables businesses to create content using AI assistance. It can generate social media posts, emails, website headlines, blogs, and more based on user-defined parameters.
How to get started with using Content AI in Blogs?
- Go to Sites > Blogs > Create New Post.


Once you create a new blog post, Add the meta description.
Next, you can go to the blog post editor, where content AI will be available.
Click on Content AI; it will ask you to choose the option of Outline, Introduction, and Specific Section and write the post title, post description, keywords, tone of the Content, and several variations. ,
Please Note:
Outline - They are bullet points to structure your blog and give a general idea about the post.
Introduction - First paragraph of the blog shares the main concept of writing the blog post. Central
Specific Section - If the blog has 5 sections, you can create Content for one blog section with this part.

Post Title – Enter the name of the topic or category of Content like “Content Marketing”
Provide a brief description of the post – The post description should be like “Top 5 content marketing channels”.
Add Keywords – Enter the keyword (enter the word and hit enter) like “content, marketing, strategy, content generation.”
Writing tone – Choose the tone from the given options.
- For example, for generating Content,
- Type of Content – Select “Outline” of the blog.
- Choose the number of variations from 1 to 5
Once the form is filled, it generates variations of suggested prompts. Once you copy the variation content, it will appear on the right side of the editor space. If the post details are good, click continue to create a post. The Content will get added in the caption area.
How to create a Social Post with Content AI?
AI-powered Content AI is available for Social Planner, followed by it will be everywhere for generating AI-powered content.
Step 1: Go to Marketing > Social Planner > New Post
Step 2: Once you create a new post with the option of Content AI.
Next, it will ask you to write a post title, post description, keywords, tone of the content, and the number of variations.

For example, for generating the content,
Post Title – Enter the name of the topic or category of content like “Content Marketing”
Provide a brief description about the post – The post description, like “short-form videos are changing the marketing trend in social media marketing strategies.”
Add Keywords – Enter the keyword (enter the word and hit enter) like “short-form videos, marketing, strategy, content generation.”
Writing tone – Choose the tone from the given options.
Choose the Number of variations from 1 to 5
Step 3: Once the form is filled, it generates variations of suggested prompts. Once you copy the variation content, it will appear on the right side of the editor space.
Step 4: If the details of the post are as per your requirements, click Continue.

Image Generation
Image Generation using Content AI is an innovative feature that creates unique images based on user-provided descriptions. It’s a crucial part of the Social Planner platform, where it assists users in making their social media posts more engaging and visually appealing.
With Social Planner, users can plan their social media content, while Image Generation using Content AI handles the creative aspect. Users input a description of the image they want to create in natural language, choose the number of variations they wish to see, and select the Style for the image.
Content AI then processes this information and generates a unique image that aligns with the description and style preferences. This feature is particularly useful for content creators, marketers, and social media managers, as it allows them to create custom images for their posts without needing advanced graphic design skills.
What are some usage cases for this feature?
Social Media Campaigns: An agency preparing a campaign for a client’s new organic skincare line can generate various images with “A minimalist organic skincare product set against a backdrop of natural greenery.”
Promotional Events: When promoting an upcoming webinar, you can create engaging visuals with the description, “A digital webinar invite with a sleek laptop, a hot cup of coffee, and a notepad on a desk.”
Brand Awareness Posts: Boost brand visibility with posts like “An inspirational workspace showcasing a logo-branded mug and stationary.”
Client Testimonials: Turn textual client testimonials into engaging visuals. For instance, an image of a “happy client holding a sign with a positive testimonial” can be created.
Holiday Greetings: You can schedule a series of holiday-related posts using images from descriptions like “A warm, cozy winter scene with a cup of hot chocolate and a message of Happy Holidays.”
Educational Content: You can create informational posts related to industry insights. For example, “An engaging infographic on latest social media trends.”
Product Launches: For a client releasing a new line of sneakers, generate images with “A trendy pair of sneakers on a graffiti background.”
Content Series: You’re running a ‘Tip of the Week’ series on productivity hacks. Generate images using descriptions like “A serene home office with a tip on time management overlay.”
Employee Features: Spotlight team members by generating images with descriptions such as “A professional portrait of [employee name] with a brief bio.”
Themed Posts: For something like a ‘Throwback Thursday,’ generate images that fit the theme, for example, “A vintage-style photo of an old-style typewriter with a caption about how marketing has evolved.”
Competitive advantages of Image AI:
AI-Generated Imagery: Unlike platforms like HubSpot, Salesforce, Zoho CRM, Sprout Social, and Hootsuite, this tool goes beyond standard social media management features by providing AI-powered image generation. This means that users can produce unique, engaging visuals from simple textual descriptions, not merely from a repository of pre-existing stock images.
Unprecedented Creativity and Customization: The capacity to generate images in many styles – from photography to fine art to digital art – introduces customization and creativity that other CRMs like Salesforce and HubSpot don’t offer. This opens up a world of possibilities for brand expression, enabling users to design more personalized and brand-consistent visuals.
Unified Content Creation Process: By merging social post planning with AI-powered image creation, content production becomes seamless and efficient. Unlike using Zoho CRM or Sprout Social, where you might need to juggle different platforms for image sourcing and post-scheduling, this feature allows users to plan and create all within a single platform.
Efficiency in Time and Resources: The use of AI for image generation helps to eliminate the necessity for a dedicated graphic designer or the time-consuming task of scouring image repositories – an advantage over traditional social media management tools like Hootsuite. This results in significant savings in time, effort, and financial resources.
Scalability: With AI-powered image generation, the capacity to produce content scales with your needs. Whether creating a few social posts or launching a comprehensive campaign, this feature can support your efforts more effectively than conventional tools offered by CRMs like Salesforce or Zoho.
How to use Image AI in the Social Planner?
Things to keep in mind:
Avoid Promotional Language: Words like “discount,” “sale,” or another promotional verbiage may not translate well in the context of image generation. The AI does not understand these concepts as humans do, and it may confuse the generation process leading to results that may not meet your expectations.
Describe Realistically: The AI generates images based on the specific elements you describe. Therefore, it’s best to provide descriptions that resemble real-world scenarios. For instance, instead of saying “20% discount on shoes,” describe the scene as “A stylish pair of running shoes placed next to a gym bag.”
Be Clear and Concise: While creative, ensure your description is clear and concise. Overly complex or vague descriptions might lead to inaccurate image generation. For example, instead of saying, “an exciting place where kids have fun,” you could say, “A colorful children’s playground with slides and swings.”
Avoid Symbols: As the AI interprets symbols differently, avoid including them in your descriptions. For example, using the “$” sign to imply something is expensive might not give the expected result. Instead, describe it as “A luxurious diamond necklace in a velvet box.”
Specify Important Details: If certain elements are crucial for your image, mention them. For instance, if you’re describing a room and a certain color scheme is essential, include that. Specific.
Experiment and Learn: The more you use the tool, the better you’ll understand what type of descriptions yield the best results. Don’t hesitate to try various descriptions and styles to see what works best for your needs.
Step 1: Go to Marketing > Social Planner > New Post

Step 2: Select the social you want to publish once you create a new post.

Step 3: Click on the Image upload icon and select the Generate Image with AI option in the dropdown.

Step 4: For generating the image
Describe the image – Enter the description of the picture. Content AI will generate realistic images and art from a description in natural language.
Choose the number of Variations –Choose the Number of variations from 1 to 5
Choose Style for the image –
Three style categories are Photography, Digital Art, and Fine Art.

Please Note:
Please avoid words like discount, sale or any symbols in the description. Please describe in realistic manner as given in example.
Example 1
Describe the image –
A vibrant fruit salad in a glass bowl
Choose the number of Variations – Select two variations
Choose a style for the image – 3D Model

Example 2
Describe the image –
Serene sunrise over a mountain range
Choose the number of Variations – Select four variations
Choose a style for the image – Photo

Step 5: If the details of the image are as per your requirements, click Continue.

FAQs
Q: How many styles can I generate for the image?
Content AI provides photo, film, Dreamlike, Digital Art, Poster, Vector, Colorful, 3D Models, Pastel Art, Sketch, Watercool, and Color Pencils.
Q: I want to check the old image-generated content. Where can I check it out?
To check the generated content via Content AI, go to Automation> Content AI to learn more details and see the various content generated.

Q: Can Content AI help me create a series of themed images for a social media campaign?
A: Absolutely! You can use consistent descriptions and styles in Content AI to create a series of related images to provide a unified aesthetic for your campaign.
Q: What happens if I provide a fantasy or abstract description?
A: Content AI is versatile and can interpret and generate images from various descriptions, including fantasy or abstract ones. However, the results may vary based on the specifics of the description. It’s always worth trying out!
Q: How can I leverage the ‘number of variations’ feature for my social media strategy?
A: The ‘number of variations’ feature allows you to explore different interpretations of your image description. This can be particularly useful for A/B testing, enabling you to understand which type of visuals resonate best with your audience.
Q: Is there a limit to how many AI-generated images I can create?
A: As of my last update, there isn’t a specific limit. However, usage policies may vary, so checking the current terms and conditions for accurate information is recommended.
Q: Can Content AI create animations or GIFs based on my description?
A: Content AI is designed for static image generation as of the last update. It may not support animations or GIFs.
Q: Can Content AI understand and interpret metaphors in the image description?
A: While Content AI can interpret a wide range of descriptions, it might struggle with metaphors as they require a level of abstract thinking that AI has not fully mastered yet. It’s recommended to use literal, clear descriptions for best results.
Content AI in Emails
Writing assistant Content AI helps generate 10X faster, more effortless, and better Content. Content AI in Emails generates outlines, introductions, specific sections, and variations for different email contexts, including promotional emails, introduction emails, coupons/discounts, recurring newsletters, testimonials, cold outreach, and content/giveaways. It can also be used to create subject lines and variations. Using Content AI in Emails makes creating email content faster and more efficient while allowing for tailored Content based on specific business needs.
Who is this feature going to be useful for?
The Content AI feature in emails can be helpful for businesses of all sizes that engage in email marketing. It can benefit individuals, small businesses, and larger organizations by providing a fast and efficient way to create email content. The feature can help companies with limited resources, allowing them to create professional-quality emails without hiring a dedicated content writer or marketing specialist.
The benefits of using Content AI for Emails.
- Faster and more efficient content creation: Content AI can generate outlines, introductions, and specific sections for emails, which can save time and reduce the effort required to create content from scratch.
- Tailored Content: Content AI can help businesses tailor their email content to specific contexts, such as promotional emails, introduction emails, coupons/discounts, recurring newsletters, testimonials, cold outreach, and content/giveaways.
- Variations for A/B testing: Content AI can create variations of email content, including subject lines, which can be used for A/B testing to determine the most effective Content.
- Usage-based pricing: Content AI is charged with usage-based pricing per word usage, making it a cost-effective solution for businesses of all sizes.
- User-friendly interface: Content AI is easy to use, with a drag-and-drop interface that allows users to create emails quickly and efficiently.
How to get started with Content AI for the Email Text block?
Go to Marketing> Emails > Email Campaigns>Create Campaign or Edit an existing campaign.
Please Note:
Content AI is available in Email Templates as well as and Email Campaigns.

For Email Templates, head to Marketing>Emails>Templates>New, or Edit an existing template
Inside the Email Builder, You can either drag and drop a new Text Block:

Or you could edit an existing Text Block:

Click on the Content AI button above the text editor block:
It would be best to start by Selecting the context in the Select Context dropdown. It will ask you to choose the option of contexts like:
- promotional email
- introduction email
- coupon/discount
- recurring newsletter
- testimonial
- cold outreach
- content/giveaway
- other, if the email context is not mentioned in the dropdown and you’d prefer a broader category.

You can then add the Content Title.

Then write a Content Description of up to 3 lines.
You also need to Select the Writing tone.
And then finally, you would need to choose the Number of Variations you want to create before you click on Generate.
Once you click on Generate, it should generate the desired variations, which may take five to ten seconds, depending on the Number of Variations. It will then ask you which of the Variations you want to use. Click on Copy next to the one you want to use, and then click Continue.

How to get started with Content AI for button blocks?
Go to Marketing> Emails > Email Campaigns>Create Campaign or Edit an existing campaign.
Please Note:
Content AI is available in Email Templates as well as and Email Campaigns.
For Email Templates, head to Marketing>Emails>Templates>New, or Edit an existing template
Drag and drop a Button Element into the Email body, then click on Content AI.

Enter Content Description to describe what kind of text you want to generate; choose the Number of Variations you wish to create, and then click on Generate. It will then ask you which of the Variations you want to use. Click on Copy next to the one you want to use, and then click Continue.

How to get started with Content AI for the subject line?
Once the Email Campaign content is created, Content AI is available in the subject line in the send and schedule screen.


You will then need to provide a Content Description, Choose the Writing tone, and the Number of Variations you want to generate, and then click Generate.

It will then ask you which of the Variations you want to use. Click on Copy next to the one you want to use, and then click Continue.
FAQ
How many tones can I generate for the Content?
Content AI provides funny, casual, excited, professional, witty, sarcastic, feminine, masculine, bold, dramatic, grumpy, secretive, respectful, and persuasive
I want to check the old generated Content; where can I prevent it?
To check the generated Content via Content AI, go to Automation> Content AI to learn more details and see the Content you have already generated.
Will the CRM provide a language option in Content AI?
We will expand our scope to provide language selection to generate a content variation.
Will the CRM provide long-form Content in Blog with Content AI?
We will expand our scope to provide long-form Content in Blogs.
Getting Started with Reviews AI
Accessing Reviews AI: To get started, log in to your account and navigate to Reputation tab. The Reviews AI feature is available on the Reviews Section.

a) Suggestive Mode: Crafting Authentic Responses
Suggestive Mode helps you compose personalised and genuine review responses. It provides suggestions based on the review content, making it easier to engage with your customers authentically. In suggestive Mode users have to select the AI Reply button, and the Reviews AI will generate unique review responses.

Note: You can regenerate the review responses. Each regeneration will cost 0.08$ after the first three free trials are consumed.
b) Auto-Pilot Mode: Streamlining Your Review Management
Auto-Pilot Mode is designed for efficiency. It allows you to automate the review response process, saving you time while maintaining a professional and personalised touch.
With Auto-Pilot Mode, you have the power to:
- Customise automated responses based on star ratings.
- Define the wait time before sending each response.
- Add a personal touch with review response footers, including thank-you notes or your business name.
- Tailor auto responses for specific sources, such as Facebook and Google.

Pricing Structure
Our pricing structure is designed to offer flexibility and affordability:
- 3 free Responses in suggestive mode: Delight in the capabilities of Reviews AI with your first response being the only chargeable one. After that, enjoy three responses on the house.
- Subsequent Responses: Pricing at a Glance: Starting from the 5th response, all additional responses are charged at a competitive rate of 0.08 cents per response.
- All Responses via Automated Response Mode: Enjoy the same affordable rate of 0.08 cents per response for all automated responses.
- Managing Your Billing: Keep track of your usage and manage your billing conveniently through your account settings.
Best Practices for Reviews AI:
- Tailoring Responses to Your Brand: Customise suggested responses to align with your brand’s tone and personality.
- Monitoring and Customising Auto-Pilot Responses: Regularly review and adjust Auto-Pilot responses to ensure they reflect your brand’s values and standards.
- Engaging with Customers Beyond Reviews: While Reviews AI can handle responses efficiently, don’t forget the importance of deeper customer engagement beyond review replies.
Conversational AI Bot
How to train your Conversation AI Bot effectively.
Training your bot is crucial for ensuring it provides accurate and relevant responses to user queries. The training process can be accomplished in two ways: by providing a URL of a website or for web crawlingby adding question-answer pairs in the Customize Bot Response section.
What is Bot Training and why is it important?
Bot training equips the Conversation AI Bot with the knowledge and capabilities it needs to interact intelligently with users. This involves teaching the bot to understand user queries and respond accurately, either by inputting data manually or by letting the bot crawl web content.
A well-trained bot can enhance customer support, streamline information retrieval, and improve user experiences. Regularly updating and refining a bot’s training ensures it stays up-to-date, adapts to changing user needs, and consistently delivers high-quality assistance.
Ways to Train the Conversation AI Bot

Via Web URLs
Say goodbye to time-consuming manual input when training your bot. Now, you can effortlessly provide it with website or blog URLs (yes, plural), and let the bot do the heavy lifting for you. Whenever a contact poses a question, the bot will seamlessly derive the right answers from the information you’ve provided.
URL Crawling Modes
- Exact URL
- This is the recommended option for precise training. With the Exact URL method, the bot will crawl the exact URL provided and train itself based on the information it finds there.
- How to use Exact URL Mode:
- Go to the “Bot Training” in Conversation AI Bot’s settings.
- Choose the option “Exact URL.”
- Enter the URL you want to crawl and hit “Get Data.”
- All URLs in this Domain
- If you want to train your bot with a broader range of information from a specific domain, you can choose the “All URLs in this Domain” option. The bot will crawl all the pages and links on the specified domain and provide you with the option to select which pages to train from.
- How to use All URLs in this Domain Mode:
- Go to the “Bot Training” in Conversation AI Bot’s settings.
- Choose the option “All URLs in this domain.”
- Enter the URL and hit “Get Data.”
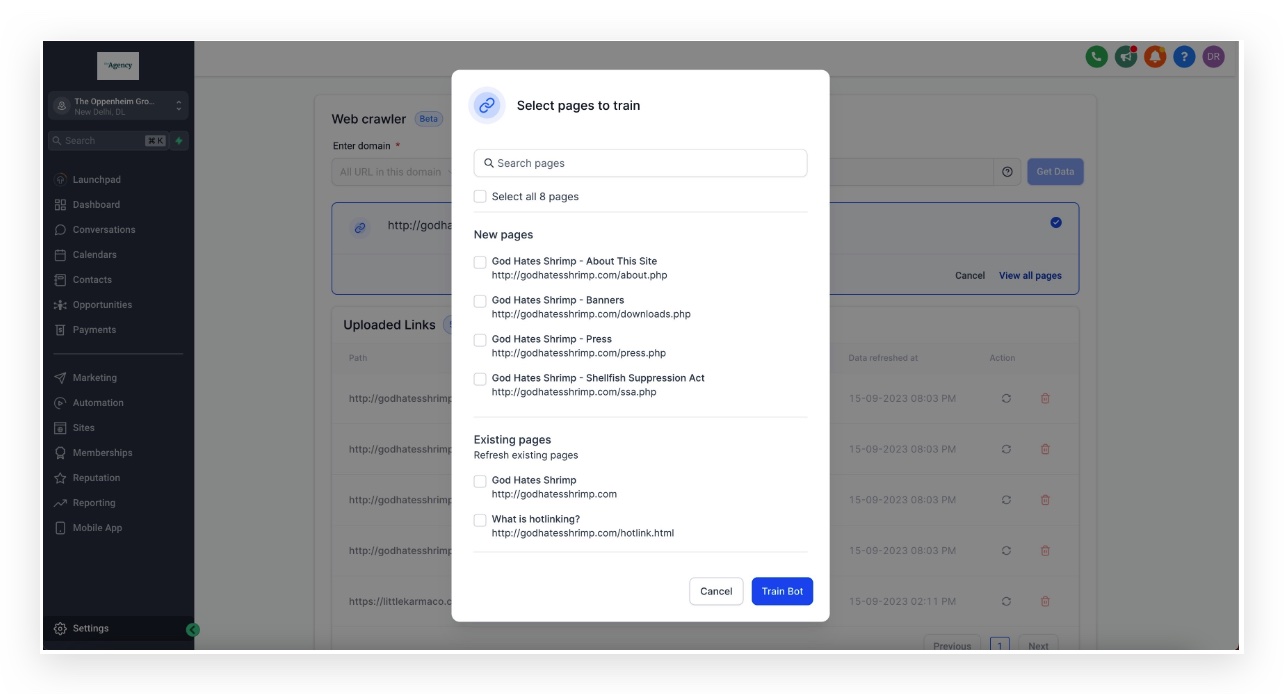
- Wait for the pages to load, and then you’ll be presented with a list of available URLs.
- Choose the pages that will be relevant to training the bot and hit “Train Bot.”
- During page selection (Step 5 above), you’ll encounter two lists:
- New Pages – Fresh URLs not part of the bot’s current training data. Selecting them will add them to the “Uploaded Links” table once the training is completed
- Existing Pages – URLs already part of the bot’s current training dataset and visible in the “Uploaded Links” table below. Selecting them will refresh all the URLs selected
- All URLs with this Path
- The bot will crawl all pages on the provided URL and allow you to select which pages to train from, based on the existence of the specified path in the page URL
- How to use All URLs with this Path Mode:
- Go to the “Bot Training” in Conversation AI Bot’s settings.
- Choose the option “All URLs with this Path.”
- Enter the URL and hit “Get Data.”
- Wait for the pages to load, and then you’ll be presented with a list of available URLs.
- Choose the pages that will be relevant to training the bot and hit “Train Bot.”
Uploaded Links Table
All the links/URLs that the bot has been trained on are visible in the Uploaded link table

Each URL will have one of these 2 statuses:
- Trained – The bot successfully learned from this URL. The “Last data refreshed at” date-time is also visible which can be used to identify if a fresh data refresh is required for that specific URL
- Failed – The bot failed to train for this URL. You can either refresh and try again or delete the URL
- URLs are not instantly added to the Uploaded Links table. Wait for all URLs to appear in the table before using the Conversation AI bot
- On refreshing a URL, wait for the last data refresh timestamp to update before testing the bot
- Maintaining concise and relevant data significantly boosts the bot's performance and responses. Regularly review and remove irrelevant URLs from the Uploaded Links table
Using Google Docs
How Does it Work?
The process of training the conversation AI bot with Google Docs is straightforward and user-friendly:
- Source of Information:
Users can extract information from various sources such as files, PDFs, documents, websites, manuals, etc. This allows for a versatile range of data to be utilized for training.
- Document Types:
Any free-form text, question-and-answer sets, or content copied from different platforms can be seamlessly added to a Google Doc.
- Google Doc Permissions:
To initiate the training process, users need to change the permission settings of the Google Doc to “Anyone with the Link can View.” This ensures the bot can access and learn from the document’s contents.
- Bot Training:
The final step involves adding the URL of the Google Doc to the WebURL-based Bot training. This process initiates the training session, allowing the bot to absorb and understand the information provided in the document.
Manually via Questions and Answers
In addition to training via URL crawling, you can manually add question-answer pairs to customize your bot’s responses. This method allows you to fine-tune the bot’s knowledge to address specific queries from your users.
How to manually train the bot:
- Access the Conversation AI Bot settings.
- Locate the “Customize Bot Response” section.
- Add a new question and its corresponding answer.
- Repeat this process for each question-answer pair you want to include in the bot’s training.

FAQs
Q: Can the Bot book appointments on the calendar rather than sending the booking link?
A: Currently, the bot can only send the booking to the contacts and not book an appointment directly but this is in development and will be out soon.
Q: Can the bot be trained based on Google Sheets and Docs?
A: The bot only supports webpages or blogs for now. Google Sheet and Docs support coming soon.
Q: I am not able to find Conversation AI settings in sub-account settings.
A: Try enabling “Conversation AI” in the “Company” tab in the Agency Settings sidebar or contact support.
Q: Can I Upload documents (PDF, text, or doc) to train the bot?
A: Bot training on file upload is coming soon.
Q: What is the purpose of the “thumbs up” and “thumbs down” icons on the Bot Trial Page?
A: These icons serve as a feedback mechanism. The “thumbs up” icon indicates that the bot’s response is correct, while the “thumbs down” icon allows users to edit the bot’s response or the question.
Q: How does the feedback mechanism on the Conversation Page differ from the Bot Trial Page?
A: The Conversation Page mirrors the functionality of the Bot Trial Page. Both pages allow users to provide feedback or make corrections using the “thumbs up” and “thumbs down” icons.
Q: How does the “Train Bot” feature work?
A: After making necessary edits to a bot’s response or question, users can click “Train Bot” to add the updated Q&A pair to the bot’s FAQ database. This action refines the bot’s knowledge base, allowing it to provide better responses in future interactions.
Q: Can I edit both the question and the answer when I click the “thumbs down” icon?
A: Yes, the “thumbs down” icon opens a pop-up window where you can edit both the question and the answer provided by the bot.
Workflows AI
What is Workflow AI?
Workflow AI is a revolutionary workflow action that harnesses the power of artificial intelligence to enhance your business automation strategies. It integrates seamlessly with your CRM, responding intelligently to various triggers and actions to streamline your workflows. Utilizing advanced AI like GPT-4, this action generates dynamic and contextually aware responses, enriching your communication processes. It interoperates with various platforms, from social media to e-commerce and learning management systems, enabling diverse applications. Workflow AI also supports intricate data formatting and computations, further ensuring precision and efficiency in your operations. As a workflow action, Workflow AI empowers your business to be more proactive, responsive, and adaptable.
Usage Cases in Symphony with other Workflow Actions and triggers:
Public Figures’ Social Media Auto-responder: Use Inbound Webhooks from supported social media platforms to trigger a Workflow AI response. The response can be a general appreciation message for every new follower or a direct message.
Automated Birthday Wishes: Trigger a ‘Birthday Reminder’ to activate Workflow AI, sending a standard birthday wish to email or SMS to contacts.
Fitness Progress Updates: Once a ‘Lesson Completed’ trigger is activated in a fitness app, the workflow could send the user progress updates via SMS or email.
E-commerce Abandoned Cart Recovery: Upon an ‘Abandoned Checkout’ trigger from Shopify, send a Workflow AI-generated reminder email or SMS about the abandoned carts.
Automated Webinar Follow-ups: Using the CRM’s ‘Appointment Status’ trigger after a webinar, the workflow could send all attendees a follow-up email via Workflow AI.
Real Estate Opportunity Management: Upon the ‘Opportunity Status Changed’ trigger, automatically update Google Sheets with new data and send update emails to potential clients.
Course Completion Certificates: After ‘Product Completed’ is triggered in an online course, use Workflow AI to generate a congratulatory message and certificate to be sent to the course finisher.
Automated Restaurant Reservation Confirmation: When ‘Customer Booked Appointment’ is triggered, the workflow could send a Workflow AI-generated confirmation message with booking details.
Product Recommendations: After ‘Order Placed’ from Shopify, a preliminary step fetches relevant product data, which feeds into Workflow AI to generate product recommendations via email or SMS.
Post-Purchase Survey: Trigger ‘Payment Received’ to activate Workflow AI, sending customers a thank-you message and a post-purchase survey link.
Job Application Auto-responder: Using the CRM’s native forms for job applications, once a ‘Form Submitted’ trigger is activated, it could trigger a Workflow AI response, sending an acknowledgment to each applicant.
Study Plans: Upon ‘Lesson Started’, trigger a workflow to create a study plan using Workflow AI and send it to the student via email or SMS.
Financial Advice: After ‘Payment Received’ is triggered, use Workflow AI to generate financial advice based on payment history and send it via email or SMS.
CRM Event Follow-up: After the ‘Order Submitted’ trigger is activated, the workflow could send a follow-up email via Workflow AI, asking for feedback on the customer’s shopping experience.
Automated E-commerce Product Reviews: After an ‘Order Fulfilled’ trigger from Shopify, use Workflow AI to email the customer requesting a product review.
TikTok Influencer Campaign Management: Upon ‘TikTok Form Submitted’, the workflow could automatically add the influencer to the Affiliate Manager and send them a welcome message via Workflow AI.
Automated Event RSVPs: Use an ‘Inbound Webhook’ from an event registration form to trigger a Workflow AI response, sending an RSVP confirmation to each registrant.
Fitness Goal Tracking: After a ‘Task Reminder’ trigger related to a workout schedule, use Workflow AI to send updates and motivation to the user.
Client Onboarding in SaaS Companies: Upon ‘Membership New Signup’, use Workflow AI to send a welcome message and onboarding instructions to the new user.
Hotel Booking Confirmation: Upon the ‘Customer Booked Appointment’ trigger, the workflow could send a Workflow AI-generated confirmation message with hotel booking details.
How to set up GPT powered by OpenAI?
Create a workflow or use an existing workflow. After adding an appropriate Workflow Trigger, Scroll to Actions and add the Workflow AI – GPT powered by OpenAI Action:

Select Model
Users will be able to select from a “Model” to select from. By default GPT 3 Turbo will be selected but the users will have the option to select GPT 4 Turbo from the dropdown.
GPT 4 Turbo vs GPT 3.5 Turbo
Prompt:
Ask ChatGPT for anything to generate completions for. E.g., Could you generate a response for a customer message?

Dynamic prompts can be created by utilizing custom values.

Select Action Type
Don’t know what prompt to use, try some of our pre made action types. The prompt will auto populate and the action can be used based on that. Below options are available to select from
1. Analyze Text Sentiment
2. Summarize Text
3. Translate
4. Custom

Temperature:
Sampling temperature refers to the parameter used in generating AI text with varying levels of randomness. It is set between the range of 0.1 and 1. Higher values, such as 0.8, result in more diverse and random output. In contrast, lower values, like 0.2, produce more focused and predictable responses. Adjusting the sampling temperature allows users to customize the level of creativity and control in the AI-generated content.

Output
After setting up the ChatGPT, you can use the results in further actions in your Workflow. {{chatgpt.1.response}}

Sample Prompts
1. Generate a response – Reply to customer message
Prompt:
Your name is {{user.name}}. You are a helpful, creative, clever, and very friendly assistant. Generate a best response email to {{contact.name}} from {{user.name}} for the below message.
{{message.body}}
2. Generate Email/SMS content – Dynamic content for emails/sms
Prompt:
Generate email content without subject to promote the product in this link YOUR_WEBSITE to {{contact.name}} from {{user.name}}
3. Check Intent – To check whether the message has positive or negative intent with the power of Workflow AI and take actions accordingly
Prompt:
Just reply only with POSITIVE, if the below message has POSITIVE INTENT and negative if the message has NEGATIVE INTENT
{{message.body}}
4. Translate – Translate your default content to the contact’s language
Prompt:
Translate the below content from English to DESIRED_LANGUAGE
Hey {{contact.full_name}}, Thanks for reaching us. Let us know how we can help you!
FAQs
Should I Use Conversation AI or Workflow AI?
Most business owners will prefer Conversation AI as it is easier to use due to its user friendly interface and training features. In contrast, workflow AI offers greater control over prompts but setting it up and improving the responses is a lot more complicated than Conversation AI.
Check out this helpful comparison table to help you understand the differences and choose the best option for you.
| Conversation AI | Workflow AI |
| Recommended for most users due to its training and user-friendly interface. Easier to learn and use.Great for general requests based on trained content.Most closely answers from trained material and prompts only – not considering outside sources that are not trained. | Greater control over prompting. However, setup and improvement are more complicated.Harder to learn and use.Good for one-off needs like intent finding or custom specialized flows.Consider all of the internet and the prompt when responding to requests. |
Can I customize the behavior and responses of the Workflow AI Action?
Absolutely! You can configure the Workflow AI Action by setting the desired temperature, which controls the randomness of the generated responses. Higher temperatures produce more creative but less predictable responses, while lower temperatures produce more focused and deterministic outputs.
Are there any limitations or considerations when using the Workflow AI Action?
While the Workflow AI Action offers powerful capabilities, it’s important to note that it relies on the underlying ChatGPT model. The responses generated by the AI may not always be perfect, and it’s recommended to review and validate the output before sending it to customers. Additionally, extensive testing and monitoring are crucial to ensure the quality and accuracy of the generated responses.
Can I use other Workflow actions and Triggers with the Workflow AI Action?
Absolutely! The Workflow AI Action can seamlessly integrate with other Workflow actions and Triggers to enhance the capabilities of your workflows.
Here are some examples:
Custom Lead Qualification:
Trigger: Inbound Webhook with lead data.
Action: Engage with the lead using ChatGPT within the Workflow AI Action. Based on the conversation, use other Workflow actions to qualify the lead and trigger appropriate actions, such as assigning a sales representative or updating the lead status.
Intelligent Customer Support:
Trigger: Customer Replied or Inbound Webhook with support ticket data.
Action: Utilize ChatGPT within the Workflow AI Action to understand the customer’s query or issue. I’d like you to combine it with other Workflow actions to generate a well-informed and personalized response. Additional actions can include updating the ticket status, assigning it to a support agent, or sending a response via email.
Dynamic Content Generation:
Trigger: Inbound Webhook with a dynamic content request.
Action: Generate dynamic content using ChatGPT within the Workflow AI Action. I’d like you to combine it with other Workflow actions to process the generated content, make modifications or validations, and deliver it through the desired communication channel.
Contextual Sales Recommendations:
Trigger: Contact Changed or Inbound Webhook with contact data.
Action: Analyze the contact’s profile and previous interactions using ChatGPT within the Workflow AI Action. Based on this analysis, use other Workflow actions to generate personalized sales recommendations. These recommendations can be sent via email, SMS, or integrated with a CRM dashboard for the sales team.
Automated Event Registrations:
Trigger: Inbound Webhook with event registration data.
Action: Confirm event registrations and provide additional details using ChatGPT within the Workflow AI Action. Combine it with other Workflow actions to process registration data, update attendee lists, and send personalized event reminders or follow-up messages based on the ChatGPT-generated content.
By combining the power of the Workflow AI Action with other Workflow actions and Triggers, you can create intelligent and dynamic workflows that automate processes, personalize interactions, and streamline your business operations.