FAQs
Frequently Asked Questions
Introduction
This document should help you understand how to use your DigiRep Installation and your instant quoting tool, and hopefully will answer any basic questions that you may have! Please navigate to a section find the question that you’d like answered.
If you have a question and don’t see it answered here, please let us know!
Inbox
If you do not seen option to open the Inbox on the top left corner of your interface, please send a message to sales@repairlift.com!
The Inbox is a great way to manage communication for multiple lead types across multiple stores. It can plug directly into your Facebook messages, Google messages, Instant Quote Widget submissions, and more!
How do I follow up with my leads?
Using the Inbox feature! This should be available in the top left corner of your dashboard. To see how to best utilize your Inbox please watch this short video!
Can I segment my leads by location?
Yes you can! To do so, all you need to do is go to the Inbox and click “Create New” and then create a “Smart” inbox that is going to receive Messages:
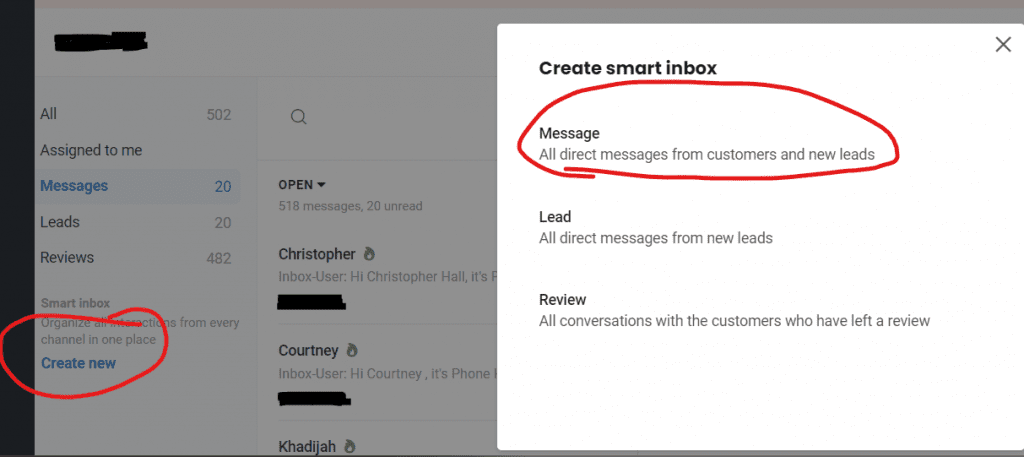
You will then get prompted with options to give the new “smart” inbox specific locations:
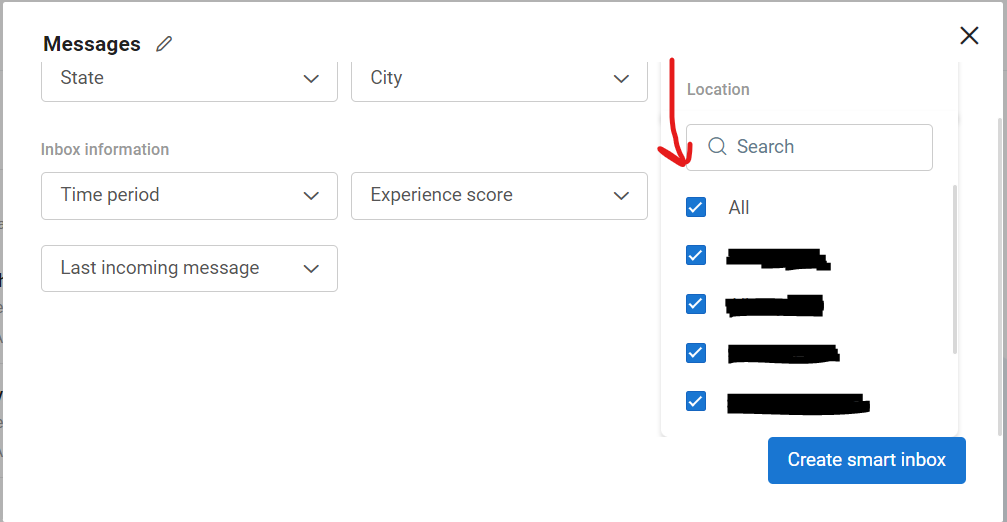
From here you can select single locations or several. You’ll then have a separate Inbox for those specific locations so your managers can easily manage their own location without needing to see every message that comes through the system.
How do I connect my Google Business Profile and Facebook pages with my Inbox?
- Log in to your Dashboard, open up your Inbox tab, and then go to Settings > Integrations and follow the instructions for each platform that you wish to connect!
- If you have multiple locations make sure to then connect your GBP and FB pages with the corresponding listings in your Inbox!
How can I add other users to my Inbox?
At the moment, employees in the back-end of the widget are not synchronized with employees in the Inbox. If you would like to add members of your team to your Inbox so that you can assign specific messages or entire locations to specific people, please ask us for help and we can create those users for you!
They will get their own login to inbox.digirepcsr.com, and if you’d like them to login to their Inbox account they will need to login there directly instead of using the “Inbox” button on the back-end of the dashboard. This is something we plan to simplify in coming updates!
Can I access and use my Inbox on my phone?
The Inbox is powered by Birdeye so you can download the Birdeye app on your phone and log in there!
Your username will be the same email that you use to access your DigiRep Dashboard, but your password may be different. If you’d like to access your Inbox from your phone in this way, just let us know and we’ll get your password reset email sent to you ASAP!
If you are an active Repair Lift client – please contact your account manager!
If you are only using DigiRep and are not on a marketing plan – please send an email to support@digirepcsr.com and we’ll get that taken care of as soon as possible.
Leads
The “Leads” dashboard is the general homepage of the back-end of DigiRep. Here you can see all of your leads’ information and export it to a CSV if you’d like to compile the contact info for an email campaign or something similar.
Now that the Inbox feature is finished we do recommend you use that page to contact your leads!
How do I see my leads?
You can simply navigate to the “Leads” option on the left to see a full list of all of your leads that come in! Each lead submission will have their:
- Name
- Phone
- Contact style that they requested (text, email, or phone call)
- Model
- Repair requested
- Location selected
- The outgoing message that they were sent (if SMS or Email)
- Their comments
- Status of the lead (which you can edit)
- Date and time of the submission.
We do recommend that you use the Inbox feature to communicate with leads as they come in but this allows you to export all of your lead data with the included information whenever you’d like with the “export” button in the top right corner of the interface!
I use Repair Desk, can I import my leads there?
Yes you can! To do so you just need to log into Repair Desk and go into each of your store’s settings and grab the API key – it’s at the very bottom of your store’s settings.
Then, go into your quote tool’s Location settings, select the proper location, and scroll down to the “Repair Desk API Key” field and paste the code there.
You can do this for all of your locations, and once a customer submits a quote form it will populate in your Leads dashboard, Inbox, and Repair Desk all at once.
Something to note: The lead in Repair Desk will have the customer’s name, email, and phone number in the proper fields but the specific details of their quote request will be in the notes section of the lead.
Can I export my leads to use them in email campaigns?
Yes you can, in fact we highly encourage it!
In the leads dashboard there is an “export” button in the top-right – if you are going to use email or SMS campaigns we suggest you add this database of potential customers to your lists.
Repairs and Devices
The “Widget” section is where you’ll manage what devices and repairs display on the front end of your quote tool.
By default, you are going to be using the following 6 categories: iPhone, Android Phone, Tablet, Computer, Game Console, Apple Watch. You can make edits to this by following instructions below!
How do I edit repairs for categories or models?
Please watch this short video!
How do I add a repair I don’t see available?
Please watch this short video!
How do I edit the devices shown?
If you simply want to prune down the list of options that are available, all you need to do is uncheck the check mark in the “widget” section for each category of devices or individual models that you don’t want to show!
If you want to add devices please refer to this video!
How can I add a new device category, series, or model that I don’t see here?
Please watch this short video!
How can I add new device models for categories that you already have?
We typically add new models within a month or so of their release, but if you do not see some models for a category that we already have please let us know! To learn more about enabling those models on your widget please watch this video!
Can I remove the “pick your model” step for some types of devices and go straight to the quote step?
Please watch this short video!
Can I change the image shown for a repair type?
Yes you can! You can navigate to Repairs on the left side and edit any repair’s image. However, we do generally recommend using a very standardized approach across all repair types.
How do I edit the timeframe and warranty information for my repairs?
Please watch this short video!
Overall Widget Settings
When you click “Widget” you’ll see a “Settings” button in the top-right part of the interface before you edit any of your devices or repairs. This is a list of settings that will effect your entire widget’s functionality!
Some of these settings are for the Repair Lift team to manage for you, but most of them are for you to customize your widget for your own needs!
How do I put the quote tool on my site?
Navigate to Widget > Settings and you’ll see a section on the right side called “Website Embed Code” with a “copy” button below it. Copy that code and embed it onto the desired page on your site!
It will put the quote tool on your site as an iFrame, and you can put it on multiple pages of your site if you’d like, or just a standalone page that you have buttons linking toward!
Any changes you make on the widget’s settings (adding devices/repairs for example) will get immediately updated on the tool.
Important to note: If you have optimization plug-ins enabled on your site, you may need to disable them for this page so that the iFrame can load properly! We recommend you check the page while logged out of your site on both desktop and mobile device to verify.
How can I add another language?
Please watch the following short video!
How can I change my Widget’s colors?
Go to your widget and click the “settings” button on the top right of your interface. Once in there, you can see “widget colors and background”, click the pencil icon to the right side of that to edit your widget’s color theme.
How can I show the map of my locations on the front-end?
Please watch the following short video!
Can I show prices before people submit for a quote?
Yes, you just need to go to your “widget” option and click “settings” on the top right of your interface. You can then select the general settings and choose to show prices on the front end.
- Please keep in mind that this will reduce your submission rate, and it will display “varies” whenever you don’t have the price filled out on your end!
- If you have different pricing for each location you will also need to “reverse locations and repairs” which is an option right below the option to show prices on the front end!
How do the appointments work?
If you’d like to turn on appointment functionality, go to your Widget option, click “settings on the top right part of your interface, and then click “edit” for the general settings and turn on “Appointment Scheduler” and if you have a URL in the “Thank you page URL” please remove it!
Once you have done this you’ll need to go to each of your locations and set their “Appointment Hours”. This can be different than your Operating Hours. Your Operating Hours is a quick line that gets included in your out going quotes, your Appointment Hours are the timeframes that your customers can book.
This means if you’re open from 10AM-7PM for example, you can have those hours say 10AM-6PM to make sure people don’t book for 6:45 with an hour long repair!
A customer will go through the quote tool like normal but then get the option to book a repair immediately afterward on the same page. Once you have set this up we recommend you test it out to see the functionality firsthand!
Location Settings
This is going to be fairly straightforward – this is where you can edit your store/location data! Your locations’ information will be pre-populated based on information you have given us but you can edit them as you see fit to change how your templates work, or if you’d like to display a different phone number, and things like that!
How can I change my location’s information?
Simply navigate to the “Locations” section in your dashboard and click the pencil icon on the right side of the location you wish to edit. Most of the settings are pretty straightforward but please let us know if you have questions about any of the fields!
How do I add a location?
- Simply click the “New Location” button in the Locations section and fill out all of the required fields. You may be prompted to increase your monthly subscription as each location costs an additional $29.99/month! Once you’ve filled out the information it may take an hour or two to show up on the front-end while our system verifies payment and creates your Inbox configuration.
- When creating a new location there is going to be a “import pricing” option that will allow you to copy the pricing from one of your other locations. We highly recommend doing this to give you a headstart on setting up your prices!
How can I remove a location?
Go to your “Locations” section in the dashboard and click into whatever location you’d like to remove and mark it as “inactive”. If you’d like to permanently remove a location from the widget you can click the trash can on the right side of the location.
Pricing
How do I update my prices?
I highly recommend watching the following short video, or you can read on below!
- The pricing sheet works in a grid format and you can edit individual repair/price combinations here.
- You can use the options at the top to sort the specific devices that you’re looking at:

- This may be helpful for editing individual repairs, HOWEVER if you want to edit in bulk we do recommend you click the “export” button in the top right corner of the interface, and you will be able to edit a CSV on your side, and that will hopefully make it much easier for you to edit multiple prices at once.
- Only the repairs that are “active” on the widget will be editable in the CSV, while the “pricing” view in the widget may include all types of repairs regardless of whether they’re active for that specific device or not.
- When you are done editing your prices, just save the sheet as a CSV again and import it back into the location you are editing. If you have multiple locations that all have the same prices, you should select the “import to all locations” option!
- Do NOT put any currency signs into your CSV – if you do that then the import will not function for that cell.

Users
How can I add other users/employees to the dashboard?
- Navigate to “Employees” on the left side and click “New Employee” in the top right corner of your interface. You’ll be able to give them a name, email, and password as well as decide what they have access to!
- We generally recommend giving employees access to Leads and Widgets if you want them to contact potential customers and edit prices on your behalf.
- If you have multiple locations, you can select which locations you want this user to have access to. This can be very helpful for franchise purposes!
Here’s a short video that covers the process:
Templates
How do I edit the instant quote message information that is being sent out?
Please watch this short video!
Support
I might have found a bug, how do I report it?
Please use the Support Center button at the top of your interface! When you submit an issue it goes directly to our team so we can work on it ASAP.
Can I talk with other widget users about how to best utilize it?
Yes you can, please join our Facebook User Group!