Help Center
Using the Instant Quote Widget
Introduction
The Instant Quote Widget is our name for the tool we like to use to send traffic to. We encourage most of our customers to use this tool as their main on-site conversion because it’s quick and easy to use for customers on the front end, and provides you (our customer) with qualified leads with real information that you can then follow up with!
This document should help you understand how to use your Instant Quote Widget and hopefully will answer any basic questions that you may have! This will go over the tabs on the left and what they do to give you an idea of where you need to go whenever you need to change something about the widget.
Inbox
If you do not seen option to open the Inbox on the top left corner of your interface, please send a message to sales@repairlift.com!
The Inbox is a great way to manage communication for multiple lead types across multiple stores. It can plug directly into your Facebook messages, Google messages, Instant Quote Widget submissions, and more!
To learn more about how to setup and use the Inbox, please go here!
Leads
This is going to be your “homepage” for the back end of the widget. This is where you and/or your techs will automatically get sent when you log in, and where you can see your leads come in:

Among the columns available, you’ll see the following:
- Name – the customer’s name they submitted on your widget
- Phone – the customer’s phone number that they submitted on your widget
- Email – the customer’s email address that they submitted on your widget
- Contact Requested – the customer asked for either a text, email, or phone call
- If they select text or email they will get sent an automatic message through that medium with the price (if you have a price for that repair in your widget), or will get told the price varies and they’ll need to bring it in!
- If they selected PHONE then you’ll want to follow up on this lead ASAP because it means they didn’t get sent anything and are hoping for a phone call! This doesn’t happen very often though
- Model – the device type that the customer needs fixed
- Repairs – the repairs that the customer asked about
- Location – the location that the customer selected (if you only have one location this will still populate on the back-end)
- Customer Comment – the client may have written out a few additional details on their request (in the screenshot provided, both customers did)
- Internal Notes – This is where you and your team can leave internal notes about a customer! If someone on your team called to follow up, they can leave notes on that follow up in here.
- Status – Also where you and your team can make updates – all newly submitted quotes will appear as “new” by default until someone on your team changes it.
- Date – the date and time when the quote was submitted.
Widget
This is where you can edit the front end of the widget and modify what devices and repairs you are showing!
By default, you are going to be using the following 6 categories: iPhone, Android Phone, Tablet, Computer, Game Console, Apple Watch
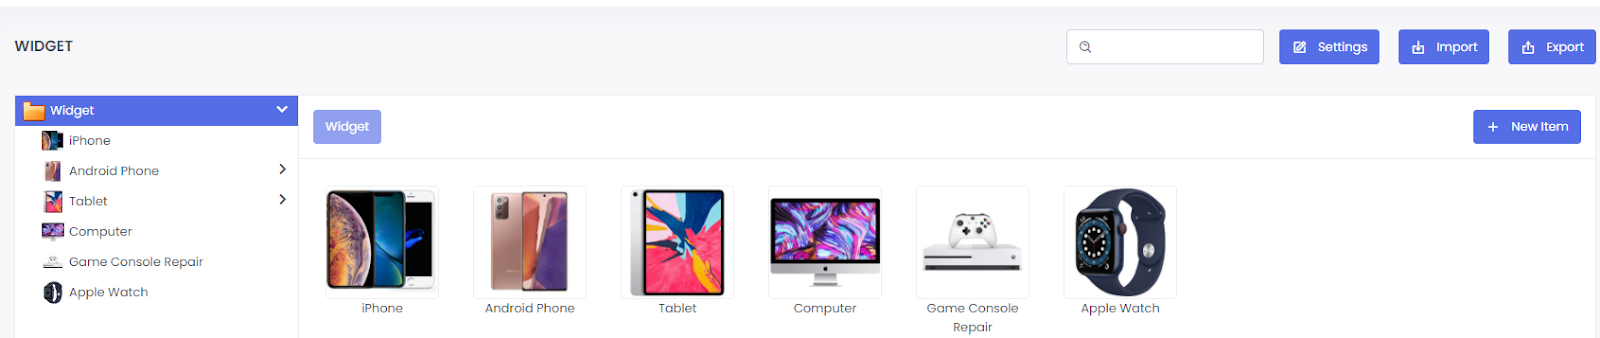
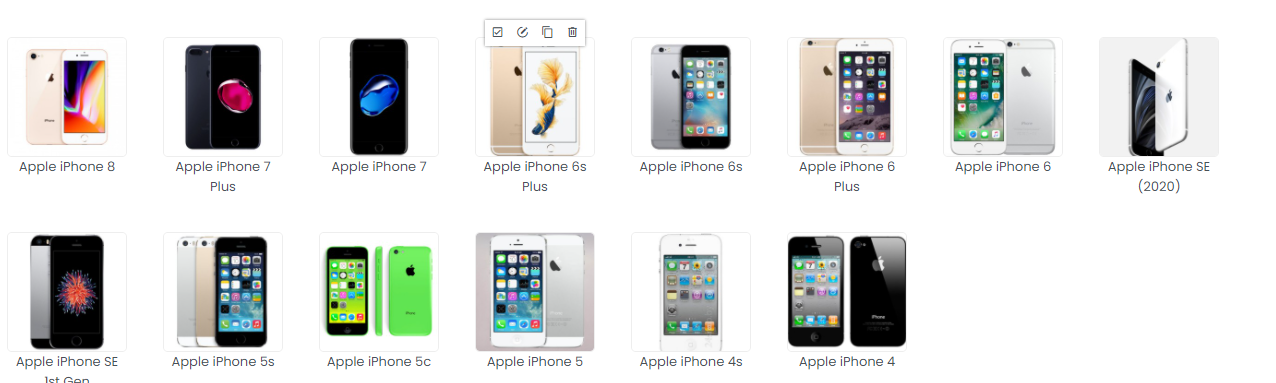
If you click into the iPhone category you will see all of the current iPhone models.
If you click into the Android Phone category you will see more “brand” level categories – you can follow that down to get to the individual model level for the most popular phone brands.
Removing devices from your widget
At any one of these levels, you can disable a repair and it will NOT show on your widgets front end! For example, if you don’t want to fix:
- Game Consoles
- Apple Watches
- Motorolas, OnePlus, HTC, Huawei, or “other” androids
All you need to do is go to the required level and click this checkmark:

And that device type will be removed so customers can’t even select it as an option.
This can be done at any level – so if you just wanted to remove some of the older iPhone models, you can click into the iPhone category and uncheck the box for individual models here:
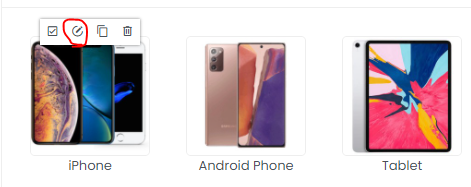
Adding and removing repairs from your widget
Similar to removing devices, you can remove any repair option that you’d like at either a category or individual level. To do so you just need to click the pencil icon at the level you want to remove a repair:
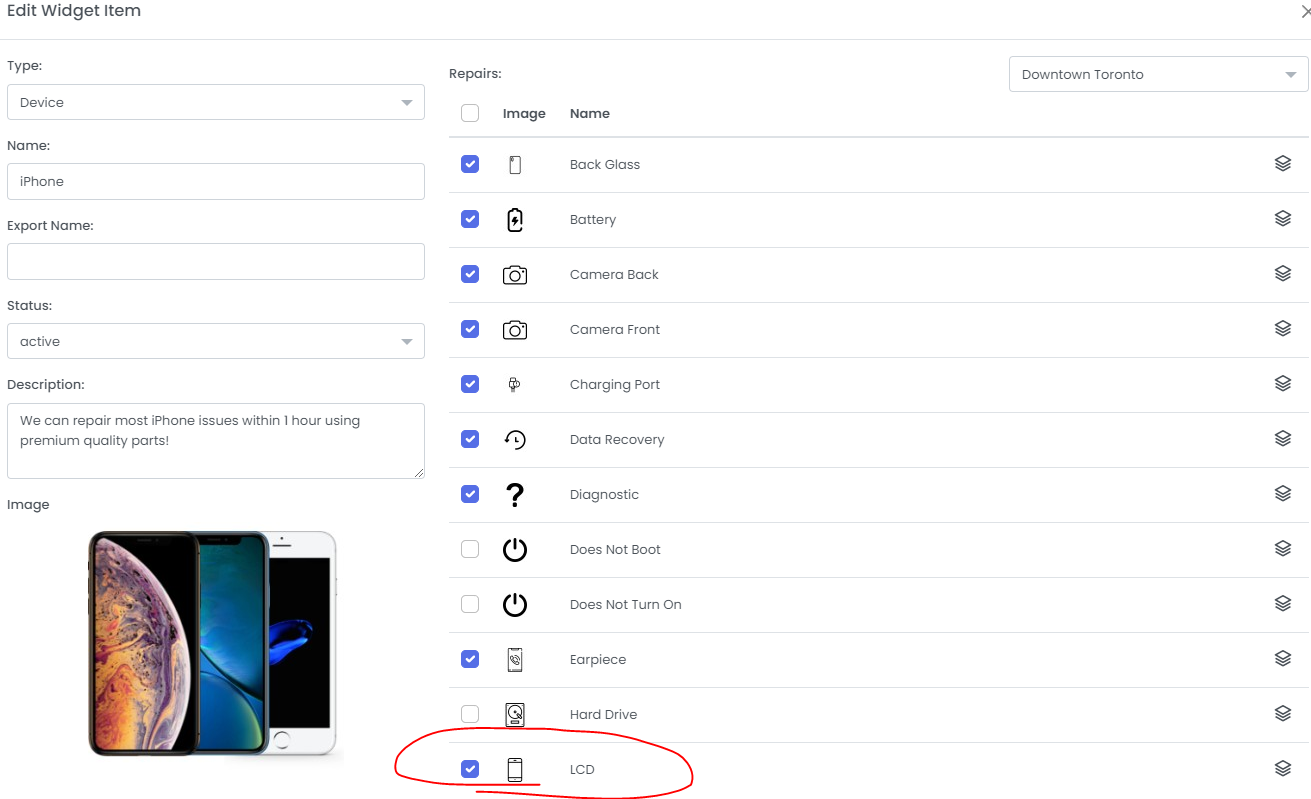
That will bring you to a list of the repairs that can be associated with that device. We have a default set of active/inactive repairs for each major category, but you can edit this however you’d like.
So for example, let’s say that for iPhones you wanted to turn off either LCD or Screen for the entire category, and you also wanted to turn off the ability for Back Glass for older models.
To do so, you would edit the iPhone category and simply deselect the LCD option here:
And then you would go into the iPhone category to look at all of the individual iPhone models, select the models individually that you’d like to remove back glass from in the same way.
You can also turn on repairs in pretty much the exact same way! For example if for iPhones you want to have “water damage” available on the front-end of the widget, you would first need to go into iPhone category and enable “water damage”

Once you have enabled the repair at the category level, it will also be enabled for all of the individual models below that category. If you would like to disable that repair from any of the models you will need to do so on a model-specific basis.
Timeframe & Warranty details
This is also where you can edit your timeframe and warranty details at the category or individual device level! To edit the timeframe and warranty for a repair you just need to click the hat on the right side:

Because most repairs for a category will have the same timeframe and warranty, we did also provide an option to “apply to all” with the settings you pick:
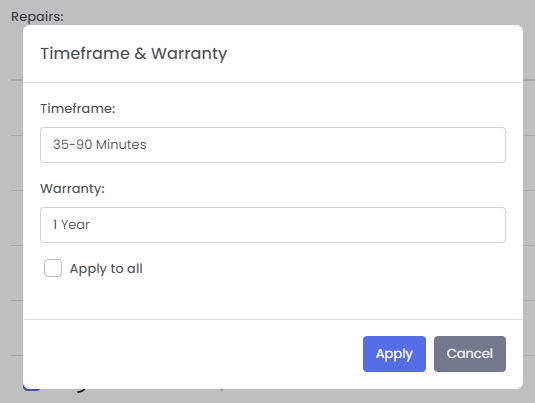
In this example the timeframe for iPhone repairs is put in as 35-90 Minutes, and the warranty is for 1 Year which is a pretty standard timeframe and warranty for all repairs.
However, if back glass repairs take longer for your shop or you have water damage selected, you can edit that individual repair afterward to be different from the rest!
These should get double checked for every main device category, and then if some specific models give you additional trouble and take longer to repair, you can always go into that specific model’s info and edit it there!
Adding a Device or Category
To learn how to add a device model or a category of devices, please watch this short video!
Additional Widget Settings
There is a “Settings” tab in the top right of the interface when you click into your widget, this is a list of settings that will affect your entire widget’s functionality.
Most of these settings are for the RL team members managing your widget when we set you up, but some of these can make your widget more useful on your end as well!
We’ve written some quick descriptions below we’ve also provided a short video to cover these features!
- Show Map – this is a toggle that allows your widget to show a map at the location step if you have multiple locations. This is especially useful for anyone with more than 3 stores!
- When people get to the location step your site will ask if they will allow or deny location access so that you can show them the most relevant location. Here’s a quick video demonstrating!
- Reverse locations and repairs & Show prices on front-end – These are fairly straightforward, if you want people to be able to see the prices on the repairs while they’re selecting them, you can toggle that option on. However, if you aren’t using a price-synced pricing sheet, then you will need to toggle on the “reverse locations and repairs” option as well so that the widget knows exactly what price to pull at that step!
- Bundle message – This is a short message that will show at the appointment step in your widget if a customer selects multiple repairs! you can edit this however you’d like, or just leave it blank if desired.
Appointments
The appointment scheduler functionality allows potential customers to select an appointment time with your shop rather than just receiving a quote. It is an optional setting that you do not need to turn on.
Here is a quick video covering how to enable your appointment features, or read on below!
In your widget settings you can simply turn on your appointment scheduler by toggling it to “yes”. However it is incredibly important that you also remove the “Thank you page URL” AND navigate to your location settings to set up your appointment hours! If you do not, customers will get stuck at your appointment step because there are no hours automatically enabled.
These hours are going to be different than your “operating hours” which get sent out in your automatic quotes. This is intentional so that if you are open from 9-6 for example, you don’t need to accept appointments right at 9 and until 6 and could set your “appointment hours” to be 9:30-5:30, whatever suits your store best.
Once you have done that I recommend testing out the functionality – the appointment’s information will come through to the Appointments section in your widget (on the left, right below Leads) and you’ll be able to see the lead information as well as the message that got sent to them when they got their quote:

Repairs
This tab shouldn’t get too much action, but if you want to ADD a repair type that you don’t see already in here then this is where you do it! It’ll get added as inactive by default.
You can also edit the images that are associated with repairs here, but keep in mind that some repairs apply to multiple device types (think “screen” for both phone and laptop repair) so if you edit it thinking about one specific device type it could look a little funky on another.
To remedy that you could add a “laptop screen” repair option, but it will also display “laptop screen” on the front end of the widget. We’ve kept our widget relatively simple and use plain icons for that reason.
Locations
This is going to be fairly straightforward – this is where you can edit your store/location data! Most of the time we will set this up for you, but if you want to make any changes to any of your locations’ data this is where you do it!
You can make changes to the following:
- Name – What this store is named on the front end of the widget
- Description – a short description of where this location is
- Directions – similar to the description, but usually a little more direct
- Image – upload an image of your storefront(s) if you’d like!
- Address – self explanatory
- Phone – the phone number of your store that displays on the front-end of the widget
- SMS Phone – this is the number that sends the instant text quotes
- This is one that we typically set up – it needs to come from either CTM or Twilio
- Email – if you select “sendgrid” at the top (which is typical) you can edit the email. That email is both going to receive a notification email when a quote is submitted at that store, and if somebody requests the instant quote via email it will be the email that is in the from field
- You can also give yourself a name – for an example see the image below
- Copy emails to – this is where you can add any secondary emails that should also get the “shop notification” emails when a customer submits for a quote.
- Repairdesk API Key – if you use RD we can get the leads to send straight to your store’s “leads” tab. If you don’t use RD, don’t worry about it!
- We intend for the IQW dashboard to be good for lead follow up and are also working on adding additional integration possibilities
- Operating hours – self explanatory
- Appointment hours – if you have Appointments enabled in your widget settings, these are the hours that people will be able to book appointments with you. This is very important to fill out because if it isn’t, people will get stuck at the appointment step!
- These can be different than your “operating hours” so that you can stop accepting appointments in the hour before you close, or right when you open for example.
- This video demonstrates your appointment functionality.
- Website – self explanatory
- Direction Map URL – this pulls automatically from the address field above, and creates the map that shows on the front end of the widget
- Status – you can mark this location active or inactive
Ex. of what the email settings look like:

![]()
Pricing
This is fairly self explanatory – this is where you come to put your prices in! It works in a grid format and you can edit individual repair/price combinations here. Here is a quick video where we go over the different options of how you can put in your prices so you can decide on the best option for you!
You can use the options at the top to sort the specific devices that you’re looking at:
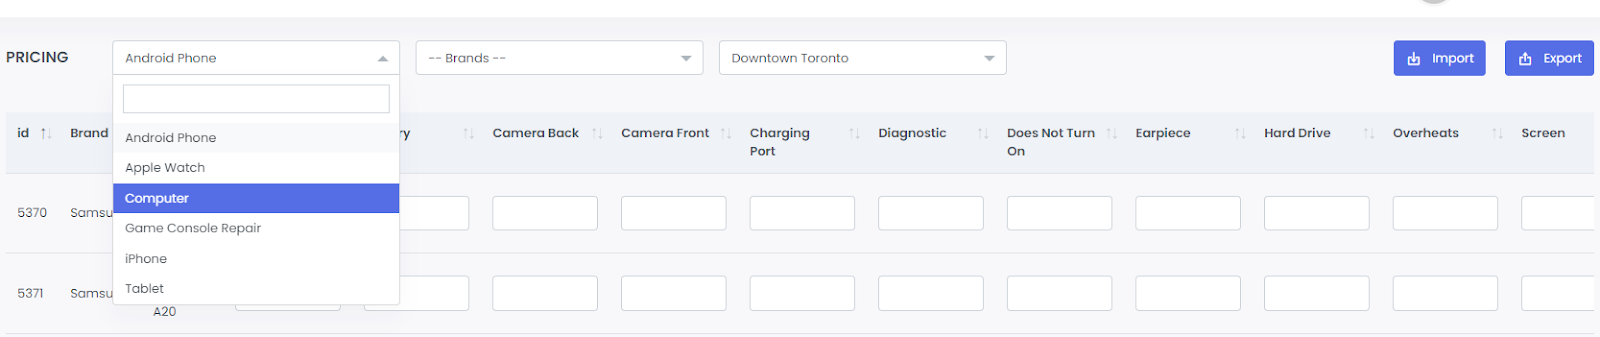
This may be helpful for editing individual repairs, HOWEVER if you want to edit in bulk we do recommend you click the “export” button in the top right corner of the interface, and you will be able to edit a CSV on your side, and that will hopefully make it much easier for you to edit multiple prices at once.
Only the repairs that are “active” on the widget will be editable in the CSV, while the “pricing” view in the widget may include all types of repairs regardless of whether they’re active for that specific device or not.
When you are done editing your prices, just save the sheet as a CSV again and import it back into the location you are editing. If you have multiple locations that all have the same prices, you should be able to select the “all prices” option.
Do NOT put any currency signs into your CSV – if you do that then the import will not function for that cell.
Employees
Here is where you can manage additional people logging into the back-end your widget. We have a few different permissions options but you can add multiple “access” options for each employee. So if you want to give several techs the ability to look at the leads sheet for following up on leads that come in that’s pretty straightforward.
The access level in the drop down will correspond with the labels in the left column:

So granting someone the following permissions will give them access to the listed modules:
- Communications – GMail, Twilio, CTM, Sendgrid
- We recommend you let us set this up for now so ignore this
- Leads – the leads dashboard
- This is where we imagine you’ll want most of your techs
- Mailings – templates (instant and manual)
- Reports – Reports tab (only the one view for now)
- Widgets – Widget, Repairs, Locations, Pricing
- This is the functionality of the widget.
To keep it simple – pretty much everybody that you want to have logging into the widget will want to have Leads access so they can view and follow up with customers.
Managers who will manage pricing changes and potentially layout changes to the IQW will need Widget access, and if they want to modify the templates then Mailings as well.
Templates
This is where your automated messages get stored – there are 4 different “templates” set up for every main device category by default, and they are almost entirely the same but they can vary based on whether they asked for an email vs an SMS, and whether you have the price filled out in your sheet or not.
For example, when people ask for an instant quote for an Android phone repair, they will get sent one of the following 4 templates depending on details from their repair:
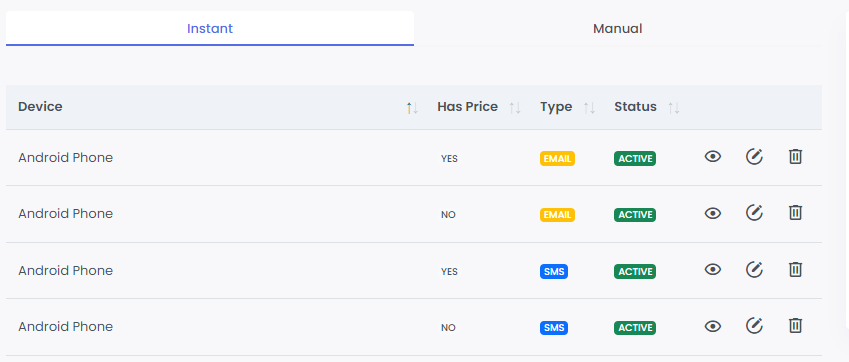
The templates are by default almost entirely the same – the big difference is that if the price is NOT in your widget, then instead of a price it says “varies”, and the following message is included:
Unfortunately we need more details to provide a quote for this repair. Please give us a call or stop by when you get a chance.
Viewing and editing a template
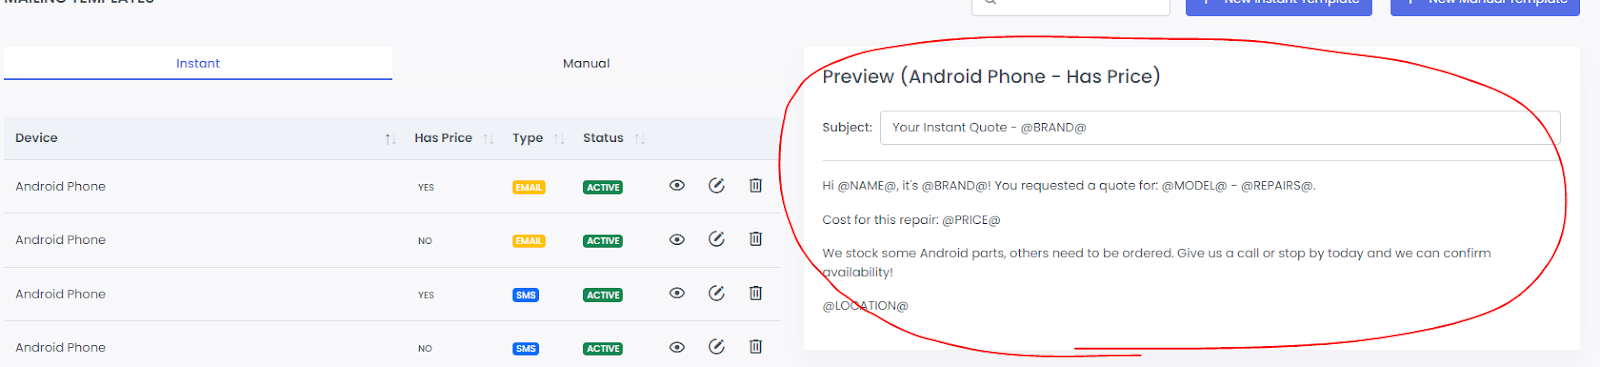
To view a template you just need to click the eye icon and the template will appear on the left – all dynamic data will be in a “@name@” format:
To edit an individual template, select the pencil icon for that template and you’ll have the following screen pop up:
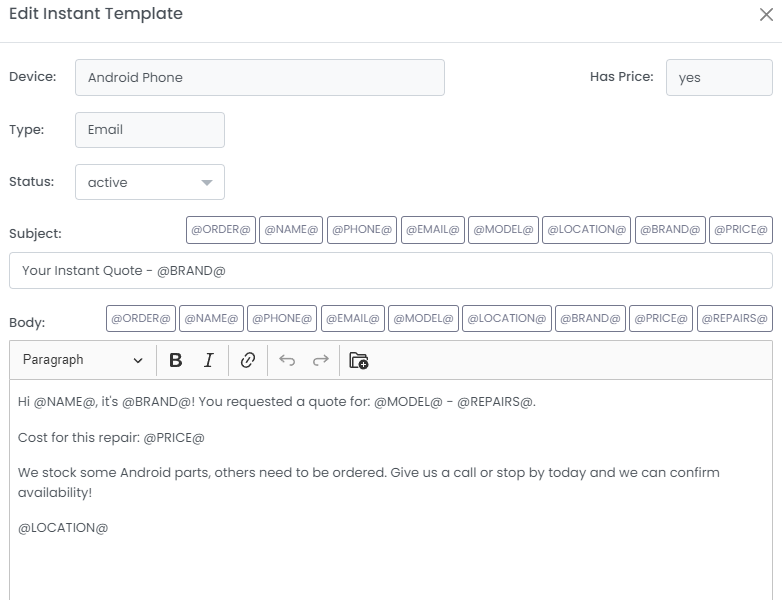
From here, you can edit the template however you’d like – the dynamic data options that you have available are included at the top of the text box. Email templates get a subject line while SMS do not.
You can put booking links into the message manually, or edit some of our premade messages as you see fit!
Any time you make edits to your template we do encourage you to test it afterward to ensure you like how it looks with all of the additional dynamic data alongside it.
Communications
Gmail, Twilio, CTM, Sendgrid
This is where we configure the details of how your widget is able to send quotes and follow up messages via SMS and email. More documentation will come regarding this, but we recommend you not mess with this for now!
Reports
This tab will just show you your total lead volume and how customers are requesting them – we plan to offer more report-based functionality going forward but for right now it’s just interesting.